Hurricane Sandy and the following Nor'Easter brought lots of things to a crawl. I spent days preparing for these events including taking down our tent garage, moving as much as possible indoors and that created havoc with my organization. To prevent my camper from blowing away, I loaded it with 500 lbs of boxes, mostly things I also did not want to get wet. Today, I spent my time unloading, reorganizing, consolidating and making a trip to the dump. Regarding my camper, it is now empty again, except for two pieces of plywood on the floor.
I need to move it to a more level area, or onto a trailer, or go straight to fixing the jack points..

Wednesday, December 5, 2012
Sunday, November 18, 2012
AeroGel

http://www.jetsongreen.com/2010/02/aerogel-ultra-thin-super-insulation.html
Sheets of Spaceloft are available is in sheets from .2 to .4" thick. These are very expensive. I do think it might be useful to clad with cloth or leather to provide extra ceiling insulation.

Aerogel is the highest insulation value material available. It provides R-10 per inch. I plan to use it for a thermal break on the metal wall studs. It cost $1.99 per inch for a thin piece of tape. If I use closed cell foam to seal the walls and fill those cavities, it seems smart to attack the next culprit of heat loss, the thermal conductivity of the wall studs. This material is called Thermalblock.
Each of these Aerogel products are mostly air and as a result are extremely lightweight products. I find them interesting for automotive applications also. A thin sheet of this material would do much to thermally insulate a car.

The insulation of my floors were simple fiberglass bats. That seems to make sense for a floor to allow for moisture to escape out of the bottom of the camper.
Wednesday, November 14, 2012
Winter Camping
With an empty camper, stripped bare, I have a lot of time to think about what I want it to do. High on my list is comfortable winter camping. That means heat without electrical demands. I also want hot water. I want my camper functional for weeks at a time in cold weather.
Ways to heat a camper: A furnance is the loud way, that draws way to much electricity. I am certain of one thing. I do not want a heat source that requires major amounts of electricity. I plan to cover my roof with solar panels, and carry a few larger 4D or 8D deep cycle batteries. If I carry a generator it will be a small quiet Honda. Insulation, R-6 closed cell foam with butyl temp for a thermal break on the framing will reduce my heating loads. I may remove some windows in the front of the camper to reduce window heat loss. Also I have storm windows and can make foam insulated panels to further reduce heat loss.
Electric heat is a safe option also, when electricity is available. The problem is, it is not always available and it can be costly.
Catalytic propane heaters: Some say these are dangerous. I feel they are safe if a window is cracked up high and a air let source is available low for good air flow. They don't require electricity and experienced RV'er appreciate these. Inexperienced RV'er with loud furnaces, have to shut them off to save on electricity or else run generators frequently--plus often they are limited to running generators day time only.
Vented propane yacht heaters are another good option. These come with hot water coils also--which is enough to tip me in favor of those.
Propane Stove: A diesel stove is too hot for summer use. Most people, myself included like propane cooking. So that will be a backup source of heat. I am tempted to get a diesel stove simply to reduce my dependency of fuel sources. If I could eliminate propane and strictly use diesel, I may go this route. My two big needs for propane are for hot water heating and cooking. Optimizing for cold weather would make it less comfortable in hot weather. I am leaning towards propane heat for hot water and cooking. I may get an on demand hot water heater to save on fuel also, with a solar hot water tank/coil heated tank to reduce or eliminate my propane needs.
Diesel Heater: I also like the idea of a marine type vented diesel heater. My tow vehicle will be diesel, and it might be nice to have the option of burning oil for heat--also without the need for electricity. These are available with a hot water coil or two.
Wood heat: I have to have wood heat. First I love it. It is warm and dry. The fuel is cheap or free. I've been reading about it and many people are violently opposed to wood heat. They don't know anything. Wood heat is a fantastic heat source, requires no electricity, although a small computer fan would help spread the heat about some, and worries about CO poisoning can be mitigated by cracking a window, and using a CO detector--something I'd have in any case. It would need constant tending in a truck camper, and that is ok with me. It would give me something to do while stuck inside on a cold evening. For unattended heating, I'd rely on another form of heat. I like the Kimberley wood stove because it is light and efficient.

Heaters could be located in the same area and share the same heat shielding.
Having four sources of heat may seem like overkill, but the reality is, four sources of heat mean you will be warm, and wood heat means you can find free fuel for a modest investment in labor.
Water freezing is a huge problem. My plan to use a Incinolet toilet would eliminate the need for holding tanks, but would also demand a lot of electricity. In the winter, campgrounds are empty and can still provide electricity, and bathrooms. I'd avoid using the toilet except when necessary. When boondocking, running a generator an hour at a time is not a huge deal. Honda generators are quiet and I could build a shield to make one quieter still. If I was in town where a generator would be a problem, there is sure to be a toilet available.
Heating the tanks: A coil running inside the water tank, connected to a heater would prevent these from freezing. My water tanks will be inside the core of my camper which will help. I'd need some unattended method of keeping it warm--a propane and/or diesel heater marine heater with a water coil seem to make the most sense.
Part of my plan is to use an old refrigerator coil as a solar hot water loop.
Gray water tanks can be just a bucket under my truck. I should be able to dump gray water filtered though a paper filters and layers of charcoal and diatomaceous earth, just about anywhere. The key would be to keep the bucket warm inside and put it under the drain when needed, returning it inside when not needed. This could be stored in the shower, for any surplus that might leak out the bottom. I'd need a way to keep the shower stall warm too.
Monday, October 15, 2012
No progress to report
While I have not touched the camper in months, due to working on my other project, I plan to start on it next month. My boat will be out of the water and I thought I'd put in two days a week on the camper starting November 1st, unless I get a delivery job to the Caribbean.
The next steps on the camper are:
1. Removing the siding to access the angle metal for the support brackets.
2. Removing the dented corner pieces, and pounding them into shape again,
3. Removing some of the siding in preparation of splitting the top to raise the roof 1 foot.
The most important is the get the mounting system working so I can move the camper and use it.
Monday, July 9, 2012
Raising the Roof
Raising the Roof: Looking around the internet, I've read
about places that refurbish AirStream trailers. One of these talked
about a project in which the height of the trailer was increased.
Sleeping on that, makes be think that might be a good idea for me as
well.
Why should I raise the roof? I'd need some compelling reasons to do that.
I studied the seams and there are two lengthwise rails on each side close to the roofline that can be separated easily. I would separate just below the angle L piece on the sides.

In front, I'd want to raise the windows higher up, so I would pick seams that are lower than the windows. I would need to make cut in two places to free that side.
Under the vertical piece of aluminum is some C-channel that could be split.
 Here is the other side. It is more exposed. Visible is the outside door access to the refrigerator. Just the the right is a doubled framing I could split. Then I'd separate it under the window. So the front walls and windows would stay attached to the roof when I lifted it up.

I did not take a good look at the back, but I'm sure that would work out fine too up high like on the sides. The only question about the back is should I put in a taller door or keep the one I have. I lean towards keeping the one I have but adding a doggie door at the bottom. Also, could I fit my motorcycle inside with double doors or a ramp--with big enough doors a motorcycle would fit.
How High?
My design model is the Bigfoot Truck 10.6E 2500 camper. It has a basement, carries 50 gal of water with 24 gray water, and 19 black water holding tanks.
I am just under 6'4" and with boots on add at least another 1.5 inches. I also have a friend that is 6'8" I would like him to be able to walk around upright. So I'd want at least another 10" may 12" more.
If I could go up another 12" the bathroom I could fit 4.5 cubic feet of gray/black water tank(s) under a step up bathroom--that is 33 gallons. If I also dropped the bottom of the floor in the overhang area, that would add more tank space in what is now outside the camper. Doing the same thing on the other side at the same time make sense also. That could remain battery/propane space or perhaps space for a Honda 2000U generator.
Spare Tire and Access: I've been thinking about removing the bumper of my truck to save weight, lowering the license plate a bit (or relocating it to the camper), and relocating the spare tire to the front of the truck. My spare tire can't be lowered with the camper in place unless I modify the mechanism. I am not sure I need a spare with a dually for daily use. For long trips I'd rather have it on the front.
What I'd like is a second fuel tank. I could fit perhaps another 40 gallons in the spare tire area. That would give me an 1000+ mile range loaded and an unloaded range of 1350 miles.
The bottom line, is the more I learn about these campers the easier it seems they are to modify. That is the beauty of aluminum framing. It doesn't rot, lasts forever, and is put together with rivets which are both very strong and easy to remove and re-rivet.
Why should I raise the roof? I'd need some compelling reasons to do that.
- I'm tall and have to hunch over a bit right now. It is not uncomfortable, but the ceiling is lower than I would like.
- Refrigerator Sizes: I have a brand new 5' tall refrigerator I can get cheap from my brother. He paid $1600 for it. I can get it by buying his entire trailer for $500 or make some other sort of deal with him. In any case, I want that refrigerator, and raising the roof is the only practical way to make it fit. I would fit where my closet and propane/battery locker was, but then I'd need to move those items.
- I need more space for holding tanks. My camper did not have holding tanks. I will need to make changes to accommodate them.
- I need space for solar hot water pre-heater tank, and a water heater for cloudy days. My new refrigerator will take up the space used by the water heater and old refrigerator.
- Extra Storage Space. I need more space than I have in there. I don't see how I can fit everything I want without more space, or sacrificing the dinette, which I don't want to do.
- The original 3.5" mattress is too thin. If I put a bigger mattress in, I lose too much headroom. I'd want a 5.5" mattress, and would prefer to have an 8" mattress. What I have now is a crawlspace of a sleeping area. It is ok, but not as useful as it could be.
I studied the seams and there are two lengthwise rails on each side close to the roofline that can be separated easily. I would separate just below the angle L piece on the sides.
In front, I'd want to raise the windows higher up, so I would pick seams that are lower than the windows. I would need to make cut in two places to free that side.
Under the vertical piece of aluminum is some C-channel that could be split.
I did not take a good look at the back, but I'm sure that would work out fine too up high like on the sides. The only question about the back is should I put in a taller door or keep the one I have. I lean towards keeping the one I have but adding a doggie door at the bottom. Also, could I fit my motorcycle inside with double doors or a ramp--with big enough doors a motorcycle would fit.
How High?
My design model is the Bigfoot Truck 10.6E 2500 camper. It has a basement, carries 50 gal of water with 24 gray water, and 19 black water holding tanks.
I am just under 6'4" and with boots on add at least another 1.5 inches. I also have a friend that is 6'8" I would like him to be able to walk around upright. So I'd want at least another 10" may 12" more.
If I could go up another 12" the bathroom I could fit 4.5 cubic feet of gray/black water tank(s) under a step up bathroom--that is 33 gallons. If I also dropped the bottom of the floor in the overhang area, that would add more tank space in what is now outside the camper. Doing the same thing on the other side at the same time make sense also. That could remain battery/propane space or perhaps space for a Honda 2000U generator.
Spare Tire and Access: I've been thinking about removing the bumper of my truck to save weight, lowering the license plate a bit (or relocating it to the camper), and relocating the spare tire to the front of the truck. My spare tire can't be lowered with the camper in place unless I modify the mechanism. I am not sure I need a spare with a dually for daily use. For long trips I'd rather have it on the front.
What I'd like is a second fuel tank. I could fit perhaps another 40 gallons in the spare tire area. That would give me an 1000+ mile range loaded and an unloaded range of 1350 miles.
The bottom line, is the more I learn about these campers the easier it seems they are to modify. That is the beauty of aluminum framing. It doesn't rot, lasts forever, and is put together with rivets which are both very strong and easy to remove and re-rivet.
Jack Support Concept
Now that I've removed the jack support bracing, I have a good idea of how to build a cheap strong internal mount for these jacks.
I had first considered buying a fiberglass panel and cutting it up and laminated them together. The costs are high for that option. The material is harder to work with, and it is heavy.
I just removed the old backing, which was 2x8 lumber. This was rotted out on the port side, and was cracked on the other. It was not tough enough and IMHO a weak point in the design or at least material's selection.
Wood Reinforcing: One problem was they would tend to split in one direction. I want a stronger wood and strength on two axis. I had a piece of oak shelving, and my friend George just gave me a 10' section of identical wood. The two of these together makes up eactly 1.5" and will fill the area nicely. Laminating two boards together with glue will make it strong. Also instead of counter sinking the nuts into the pumber I plan to let them stand proud and exposed for any future maintenance access.
Aluminum Reinforcing: A close inspection of the aluminum C channel revealed tha all four corners of the jack mount support area have cracks. This is the other axis. These are comprised of two 8' sections of aluminum. I need to either remove these pieces and replace them, or else scab on a piece of Angle (L) aluminum on top of them. That means drilling out the rivet on the curved trim on the outside. I don't think it will be all that difficult.
Dented Corners: Several of my corners are bent, and not accessible from the inside of the camper. So I've been mulling over how to fix these. It seems best to drill out the rivets, fix or replace the pieces, and then re-install. I am unsure how to put pressure on the back of rivets that are not exposed.
Riveting: I have been watching YouTube videos of the different methods of riveting. So I will need to order the appropriate size rivet and tools to install them. I have blind rivets, but these can only be used in some places.
So the bottom line, is I will have to do some metal work. And I'm excited about the idea. That will delay finishing off the jack mounts a bit. I'll have to remove the curved corner trim to scope things out from the other side, and research materials, and rivet sizes to fix the jack mounting supports.
Coming up--a crazy idea or pure genius?
Floor Removal
Another milestone!
Marco and I removed the old plywood floor in the camper. This was tough because the camper was build on top of this plywood, so it was sandwiched between two layers of aluminum and screwed into it from both sides. Fortunately the bottom was only fastened buy a few screws.
Also all the deck screw heads were rusted. I discovered the best way to remove the plywood floor was to chisel around each screw head, or in some cased I made shallow cuts with a battery powered skill saw to expose the head. It was easy enough to back the screw out of the light gauge aluminum C channel with vise grips. The only difficult part was adjusting the vise grips to be tight enough, would took a lot of force to clamp it on, and once backed out, it was a bit of a hassle to get the vise grip unclamped from the screw head.
Here is a picture of a screw prior to the vise grip removal. With a recently removed screw showing the typical state of these machine screws.

Here is the camper with the floors removed. There are a few places where the aluminum needs to be banged back into shape (see left side and right under window).

As much as I'd like to use a fiberglass floor, it seems like it would be both difficult to work with and expensive. An attractive plywood for the exposed areas will be cheaper. And I can save a bit more money by using still cheaper marine plywood under the closet, water tank and bathroom. Those I would supplement with a layer of fiberglass cloth and epoxy for a smooth water proof finish.
For the visible flooring, I have decided to use yacht style teak and holly plywood. Still to do is, is take apart one of the ladder frames supporting one of the wings, so a piece of new plywood will fit in one piece. I can slide it under one side, drop it down and refasten the ladder frame on the other side with pop rivets.
In any case, I will need to take some measurements, determine a plywood floor layout--the old plywood had a seam conveniently under the water tank, and drill out some rivets to remove one of the ladder support frames under one wing to get the plywood to fit in one piece. I also do not want any screws showing. So my plan is to perimeter screw the plywood where aluminum C channel covers it up and to use a high strength adhesive two sided tape to secure the other areas.
One possible issue is the open floor area may be greater than 8'. Since the size of the panels is 4'x8' I may need to revise my planning some. I may want to add one more floor rib at the 8' point--8' forward of the rear door. I'll have to check with my tape measure to see if that will be a problem.
Here is what the new floor will look like. This is what is typically used in yachts. It is marine plywood with a teak and holly veneer on top. Sharp looking. I love this look on a yacht.

Marco and I removed the old plywood floor in the camper. This was tough because the camper was build on top of this plywood, so it was sandwiched between two layers of aluminum and screwed into it from both sides. Fortunately the bottom was only fastened buy a few screws.
Also all the deck screw heads were rusted. I discovered the best way to remove the plywood floor was to chisel around each screw head, or in some cased I made shallow cuts with a battery powered skill saw to expose the head. It was easy enough to back the screw out of the light gauge aluminum C channel with vise grips. The only difficult part was adjusting the vise grips to be tight enough, would took a lot of force to clamp it on, and once backed out, it was a bit of a hassle to get the vise grip unclamped from the screw head.
Here is a picture of a screw prior to the vise grip removal. With a recently removed screw showing the typical state of these machine screws.
Here is the camper with the floors removed. There are a few places where the aluminum needs to be banged back into shape (see left side and right under window).
As much as I'd like to use a fiberglass floor, it seems like it would be both difficult to work with and expensive. An attractive plywood for the exposed areas will be cheaper. And I can save a bit more money by using still cheaper marine plywood under the closet, water tank and bathroom. Those I would supplement with a layer of fiberglass cloth and epoxy for a smooth water proof finish.
For the visible flooring, I have decided to use yacht style teak and holly plywood. Still to do is, is take apart one of the ladder frames supporting one of the wings, so a piece of new plywood will fit in one piece. I can slide it under one side, drop it down and refasten the ladder frame on the other side with pop rivets.
In any case, I will need to take some measurements, determine a plywood floor layout--the old plywood had a seam conveniently under the water tank, and drill out some rivets to remove one of the ladder support frames under one wing to get the plywood to fit in one piece. I also do not want any screws showing. So my plan is to perimeter screw the plywood where aluminum C channel covers it up and to use a high strength adhesive two sided tape to secure the other areas.
One possible issue is the open floor area may be greater than 8'. Since the size of the panels is 4'x8' I may need to revise my planning some. I may want to add one more floor rib at the 8' point--8' forward of the rear door. I'll have to check with my tape measure to see if that will be a problem.
Here is what the new floor will look like. This is what is typically used in yachts. It is marine plywood with a teak and holly veneer on top. Sharp looking. I love this look on a yacht.
I am leaning towards teak cabinets and furniture finished as "bright work" which means high gloss vanish. Yacht also provide ventilation for lockers so wet things can dry out. Something to think about. The Herreshoft syle is for white walls with teak trim. A combination of these two is what I will likely do. Whatever I ultimately do, it needs to be something I can wipe down easily for cleanup.
Friday, July 6, 2012
Marine Theme Ideas
I thought I'd brain storm about my idea for a Marine Theme, and writing down everything I could think of. Some of these are electrical, so those might be relevant in the near future.
Here are some things I have I'd like to use.
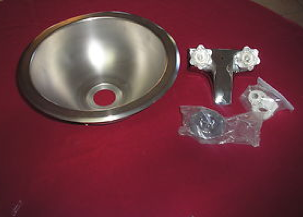
Bronze Port Hole--Make into a mirror
Brass Oil Lamp--saw one on eBay for $325! I paid $10 for mine and it could come in handy for lighting if I every lose power. It can be hung under a vent to avoid any odor.
Compass
Navigational Charts: Norwalk Islands, Vieques, St John, and Georgian Islands [framed]
Marine Inverter Charger
Solar Panels
WAGO DIN Rail wiring bus.
Marine VHF Radio
Solar Hot Water Coil
DVD Captain Ron
Thule Roof Storage Pod [not nautical but useful]
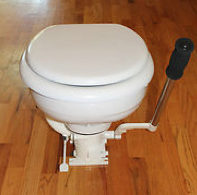
Groco Head
Things I'd like to add:
Searchlight [on Roof]
Bow Lights and Stern Light [for when parked]
Ships Weather instruments [temperature, barometer, and clock]
NMEA 2000 Bus [tank levels, speed, GPS position]
Blue Seas Marine electrical panel and battery switches.
Antenna Mast Mount [Stainless]
Nautical Music CD [or iPod Playlist--Jimmy Buffet etc]
Pictures of all my boats
Yacht type reading lamps
Sunbrealla fabric for dinette cushions.
Fold out Bimini for shade [for back side of camper]
Outdoor Grill [marine type, stainless steel, removable to mount of back]
Ships Wheel [for decoration--on back]
LED lighting [wherever practical, I plan to use some Fluorescent too]
Sea Shells decorations or curtains
Half Hull models for wall decoration
Here are a few ideas:


Subscribe to:
Posts (Atom)